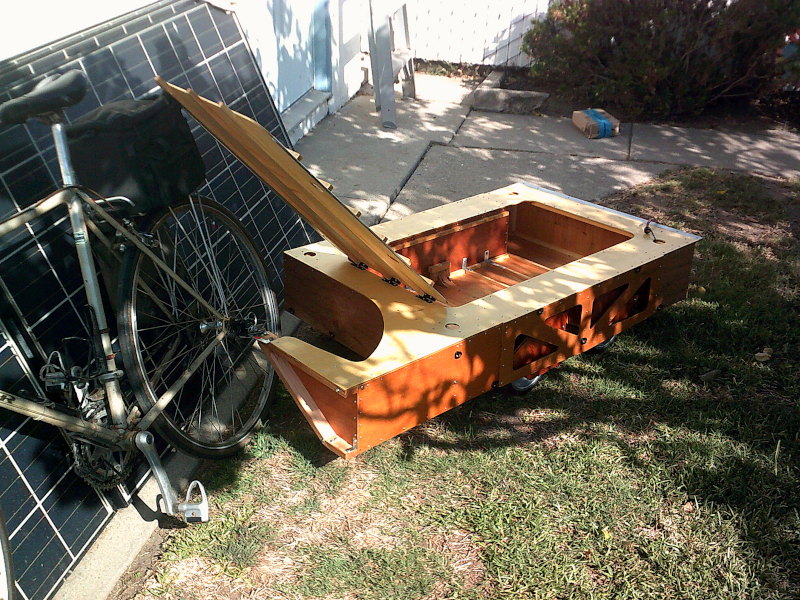
my second bike trailer, finished Aug 2026
(I still need to update the pictures.)
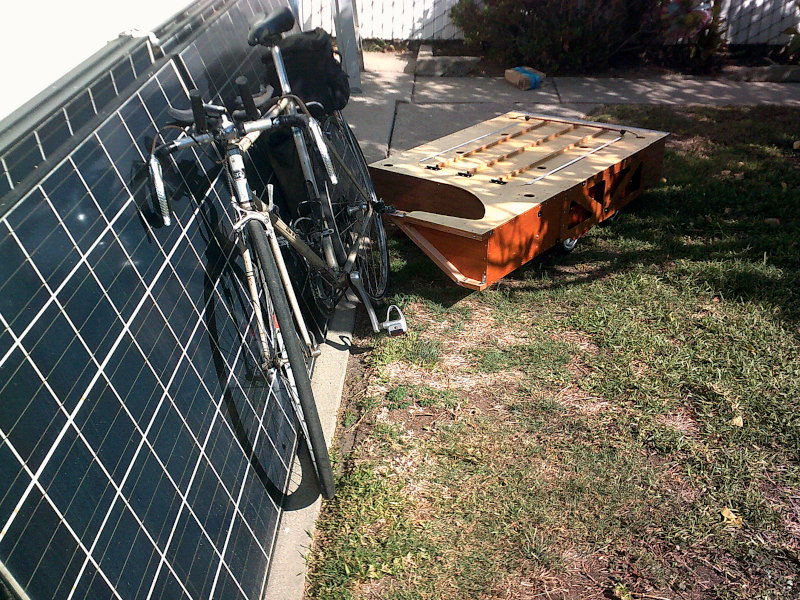
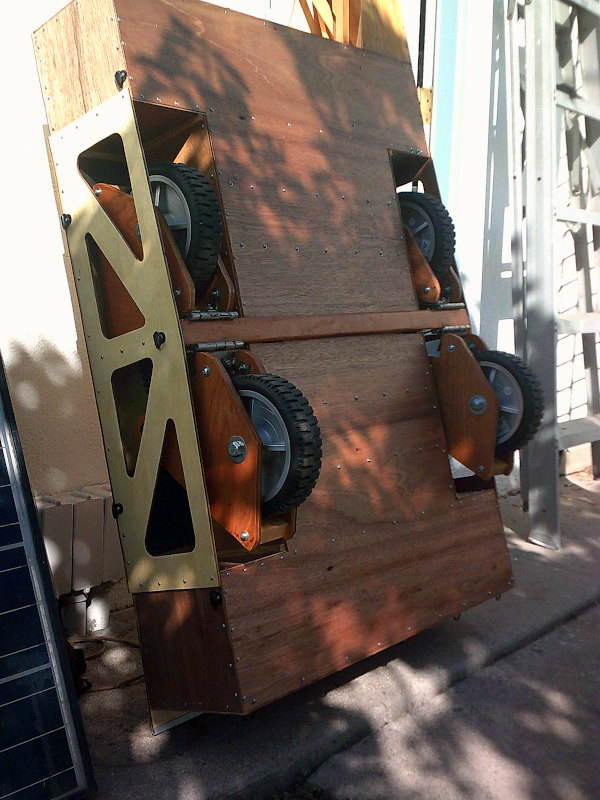
and showing the bottom as the trailer is stood up against the garage wall:
First short test ride, 8/11/26: It was super well behaved, much better than the first trailer, undoubtedly because of the really stiff tongue. It felt at least as easy to pull, even though its empty weight is nearly twice as much (43 pounds versus 25) and it can carry about four times the payload weight, and it's less aerodynamic. It is super noisy though, partly because of the rattling of the many D-rings I put around the sides to tie down big loads on the top. I'll try some kind of soft rubber goop in them that will still let them rotate. We'll see if adding some payload weight in the next test rides quiets it down. Beyond that, automotive sound-deadening material on the inside of the wood surfaces should help, but at the expense of unwanted dead weight. 54% of the trailer's empty weight is in the suspension assembly. If I remove the top door (which is on lift-off hinges), the suspension assembly is more than 57% of the overall weight!
Second short test ride, 8/13/26: I went three miles, with a 27-pound easy-up tent (the kind with no walls, just a shade, like for a backyard birthday party) in its case, strapped onto the top with bungee cords, and got it up to 20mph on flat ground. There's some play in the hitch, and now I see it's because I left out a shim. I ran into a friend and stopped to show him the trailer, and he wanted a picture. I passed a policeman who had stopped, and he gave me a look of admiration.
Third test ride, 8/20/26, was 10 miles, empty, on flat ground, after getting rid of most of the play in the hitch. That part was much better. Its greater wind resistance, compared to the first trailer, was quite evident though, at higher speeds, and in a headwind.
I started this page in July 2026, before finishing this second trailer, to show the progress. It's for much bigger, heavier
loads than the first one. Construction took so many (7)
months because there were portions where I had to just stare at it and think for a long time, and get friends' suggestions, to figure out
the next step. Then in many cases, I had to order something and wait for it to arrive. I started with a good general idea of
what I wanted; but in the building process, I encountered plenty of unanticipated details that had to be figured out. I seem to run
out of gas when a project lasts longer than seven months.
Reasons, goals, and considerations are described at the end of the page that describes the first, smaller trailer, where I tell about wanting to make this second one. A 32" max width is mentioned a few times. I ended up making it 31" instead so I could get it through our back gate without having to stand it up (which might require removing the load).
Features: 4 cubic feet of internal space, which, in spite of its size, is less than the first trailer, because this one is so shallow, to get the top deck low, but it's able to carry several times the weight strapped down on top, and that load can extend out past the sides; top door removable on lift-off hinges; 8" solid-rubber tires in a suspension system similar to walking-beam. It's not aerodynamic like the first one, but it's expected to be used for much heavier loads and in many cases a big load strapped on top which will also have its own wind resistance. This trailer is also not waterproof like the first one is. There's a large loop of wire in the bottom for traffic-light sensor loops in the street to sense. The trailer's empty weight is 43 pounds, 18 pounds more than the first one (but removing the door reduces it to 40 pounds). Only half that weight is wood. The hitch is the same as the first one, so I can keep the same kind of gizmo on all our bikes.
Why wood? Because it's easier to cut and join than metal, if you don't have special tools. Even a serious woodworker would have thousands of dollars' worth of equipment; but I'm not serious enough to spend that kind of money, and what I have are common hand tools, plus a Dremel, a hand drill, a drill stand to hold the hand drill like a drill press, a jig saw, a sander, a vice, a miter box for a manual saw, and not much else. Actually, carbon fiber would be best; but again, I have no tools or know-how to make anything with carbon fiber. Howard Hughes made his famous H-4 Hercules flying-boat transport plane out of wood, the largest seaplane ever made; so it can't be all bad. (The critics called it the "Spruce Goose;" but it was mostly birch, not spruce.) A video showing the size is here. A man could walk, standing up, inside a wing. It was intended to be a transatlantic transport plane for WWII, but the war was over before the plane was completed. The British De Havilland Mosquito WWII twin-engine fighter-bomber was also made of wood, and was one of the fastest planes of the war.
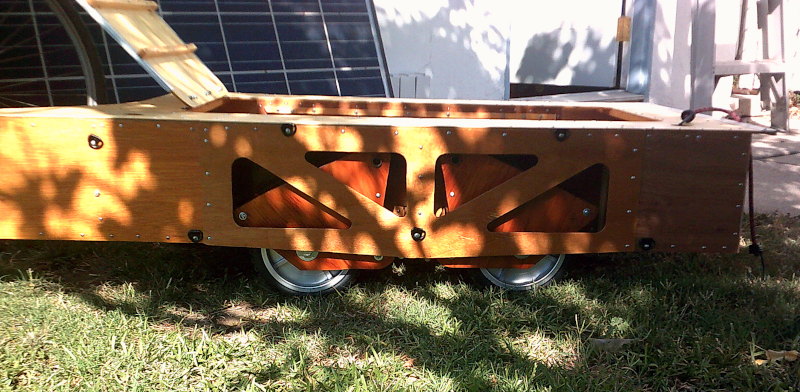
Why four wheels? It's to give the load a smoother ride. It's like making each bump half as tall. Having the front and rear of each side press against each other on the same spring means the trailer frame design was a little simpler in terms of handling the forces, particularly without putting the springs inboard of the wheels which would reduce the inside width. With better planning, I could have shortened the wheelbase by at least an inch, and the length of the wheel wells by 2"-3".
Why such small wheels? I wanted the top deck as low as I could get it, so that strapping a big, heavy load on it, side-to-side roll would still be minimal. I also wanted the top to be like a flatbed truck, where the load can be wider than the bed, without wheels sticking up and interfering on the sides. The wheels had to stay entirely underneath, even with full spring compression on bumps. If I had planned better and not changed my mind about a couple of things, the top could have been another inch lower.
Why solid tires? This trailer is for the rarer need to carry things that are too big or heavy for the first trailer. Pneumatic tires definitely have their attractions (including that they would have made the trailer quieter!); but since this trailer won't be needed very often, pneumatic tires would need to be pumped up every time I use it, and that's four tires, and pneumatic ones this small (8") don't leave room to get common pumps on the valves, a problem I ran into with our grandkids' first tiny bikes. I would also have to carry another size of inner tube for fixing flats, and fixing also becomes problematic. Solid tires avoid these problems, and these wheels are supposed to be able to carry 1100 pound each! On my third test ride, one of the tires picked up a screw. No flat tire.
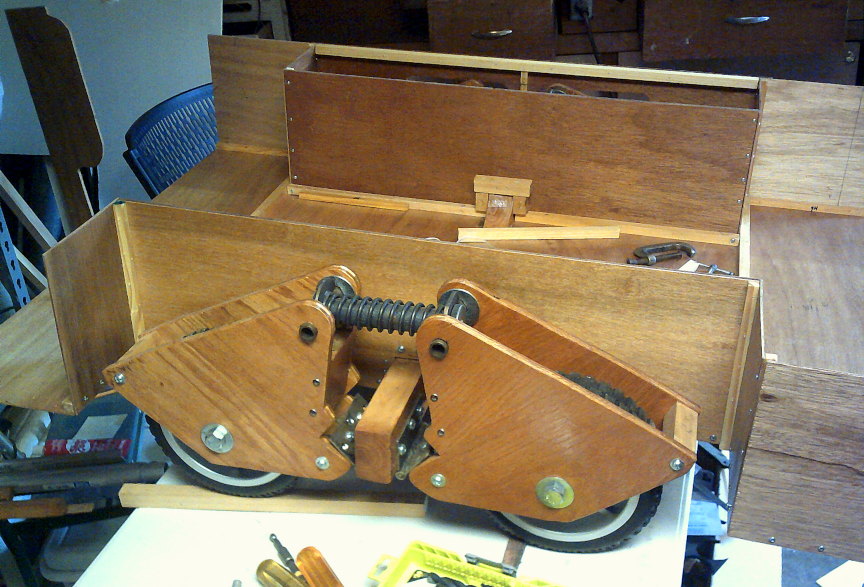
Here's the suspension assembly, a variation on the "walking beam" theme:
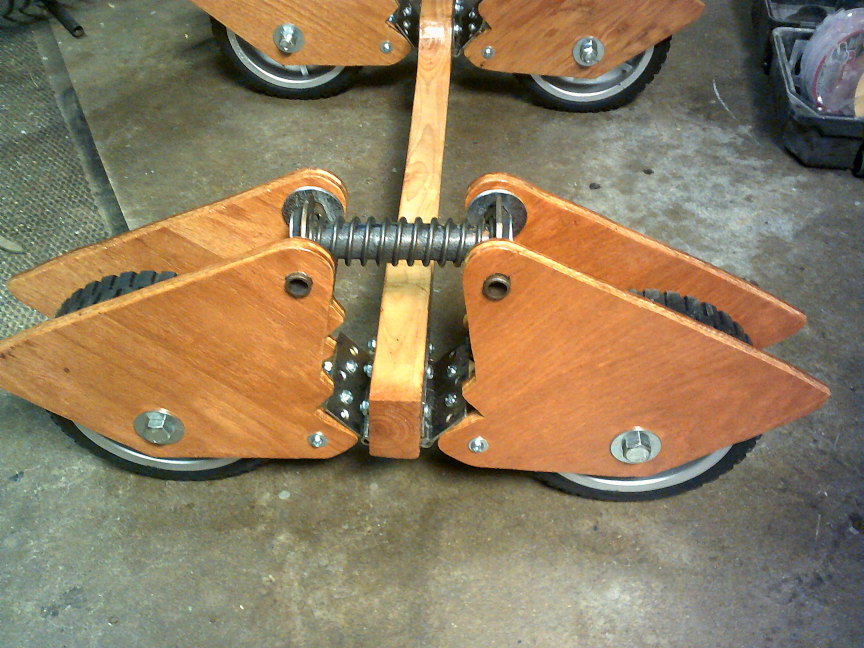
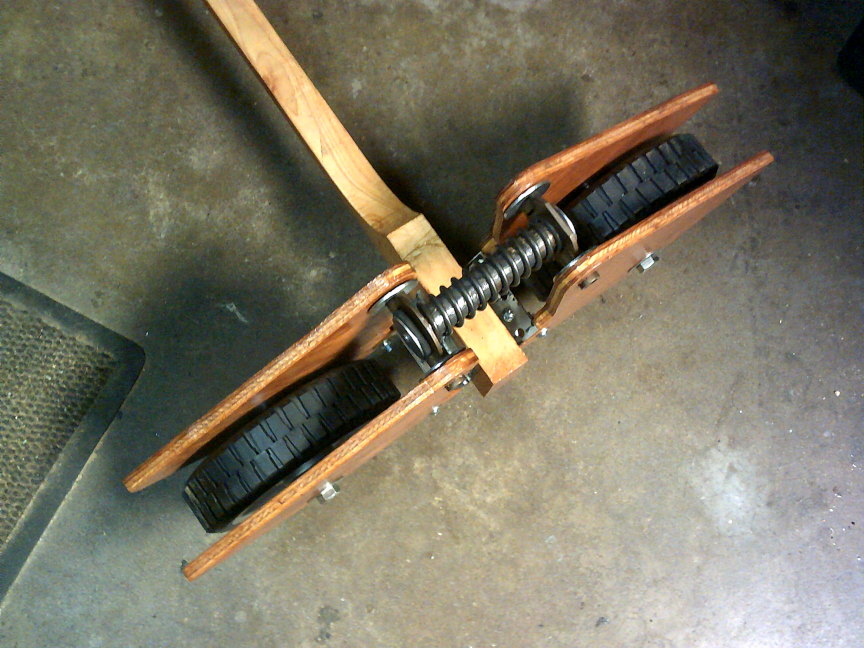
(I added braces between the side plates after these pictures were taken. You can see them if you go down about seven pictures.)
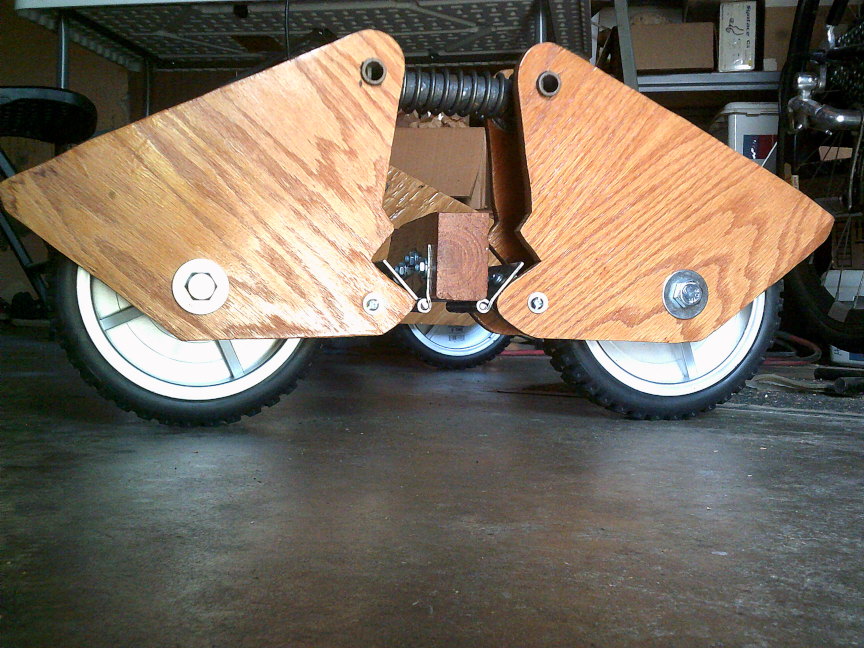
It will take several hundred pounds to fully compress the springs of both sides at once; so if I limit the load to 150 pounds (that might
be gross weight), there's still plenty of room left for absorbing bumps. The heaviest parts of the trailer are those wheels (rated
for 1100 pounds each!), bolts, hinges, and huge washers, not the wood. This suspension assembly weighs 23 pounds, six pounds more than the trailer
body it goes into! The dowels the springs fit over are black because they have paraffin and graphite on them for lube.
The following were taken in the process of making the suspension assembly:
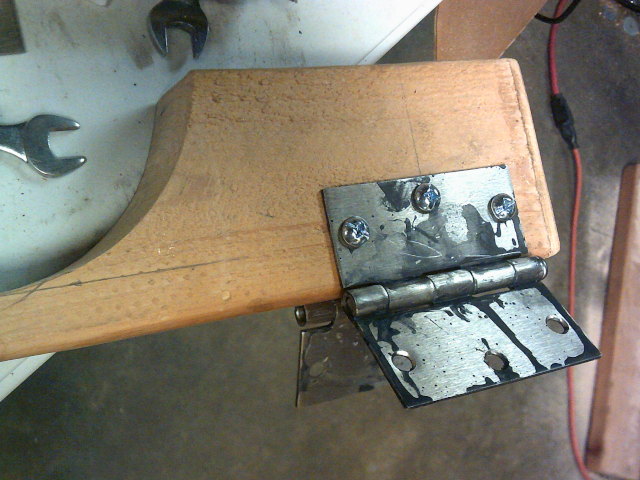
The screws are 1/4"x20tpi machine screws, tightly clamping the wood between the hinges. Again the black stuff is paraffin wax and
graphite, for dry lube.
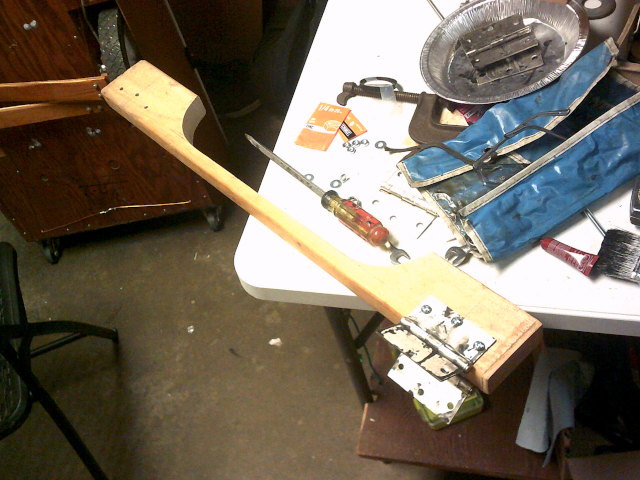
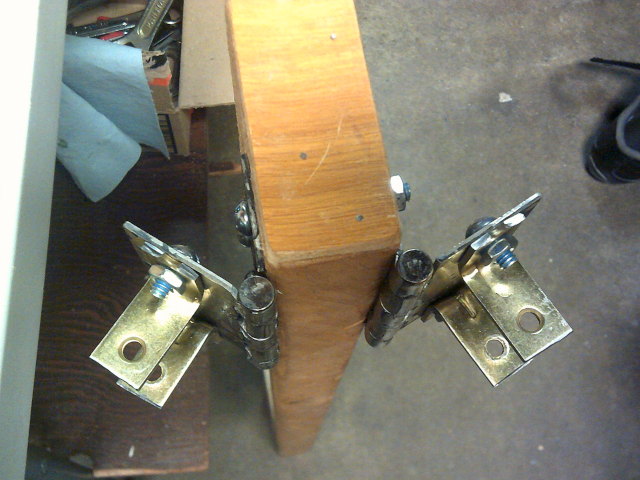
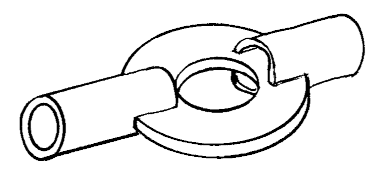
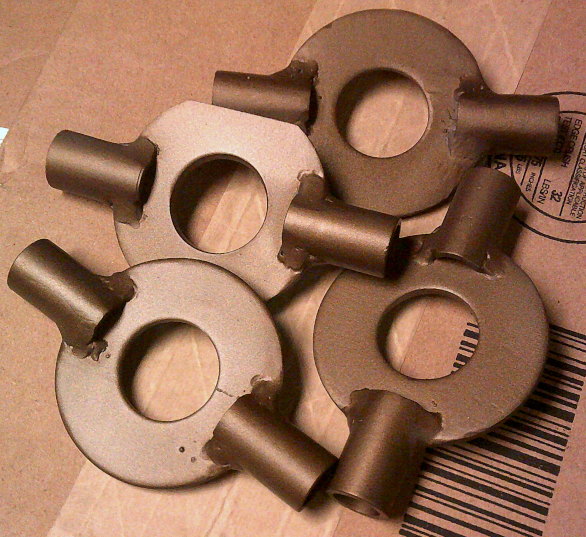
The springs, which go over 1" dowels to keep them centered, push against 2½" flat washers with 1" holes, which a neighbor welded
to sections of pipe that a machinist friend notched for me, and then the neighbor applied Cerakote to:
Here's part of the trailer showing the suspension installed:
and after some more progress:
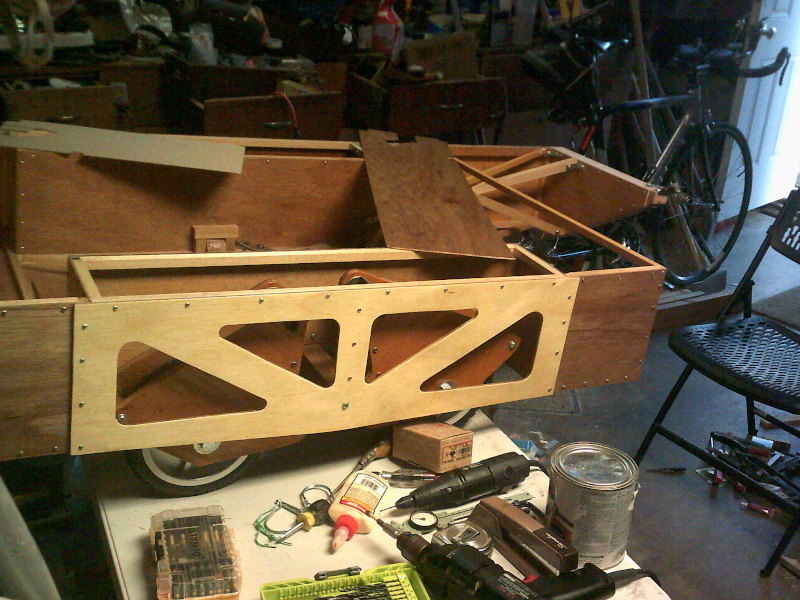
(Yeah, I should have stained the outer wood to match the rest!) The wheel well's inside vertical surface is 1/4" plywood, and so is
this fancy-cut outside vertical surface, and the load is focused down onto the thick wood bar that the wheels' frames attach to via
hinges. The darker panel lying across the top later became the front vertical wall.
8/10/26: I cut firm foam rubber pieces from a kneeling pad, and glued them to the top inside the wheel wells, so when the floating
frames that the wheels are mounted in get near the end of the suspension travel, it's not a wood-on-wood impact, but there's some padding
instead. The frame of the trailer was upside down on the garage floor for this picture; so what appears as the floor is actually the
ceiling of the wheel well:
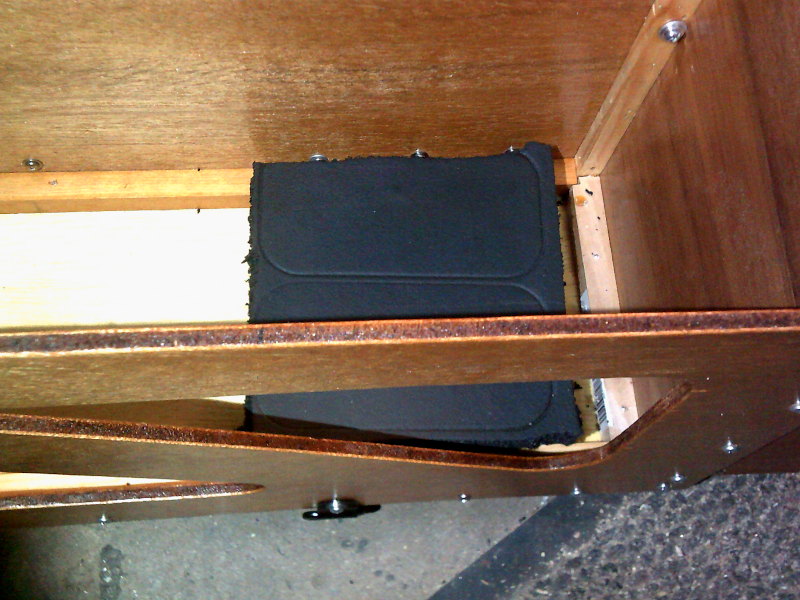
When it's right side up and you view it from the side, the foam rubber is hidden by the side panels that have the decorative cutouts.
The tongue area is all wood, with lots of triangles for stiffness and strength, something I learned from the first trailer that is super
important. It sure paid off.
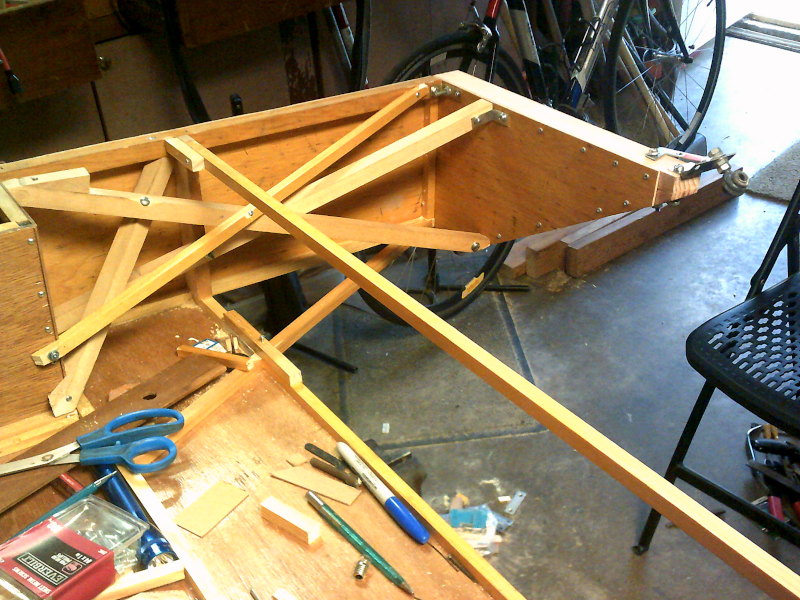
The tongue area later got plywood added over the top and bottom. The hitch joint, able to rotate in all axes, is the same as on the first trailer.
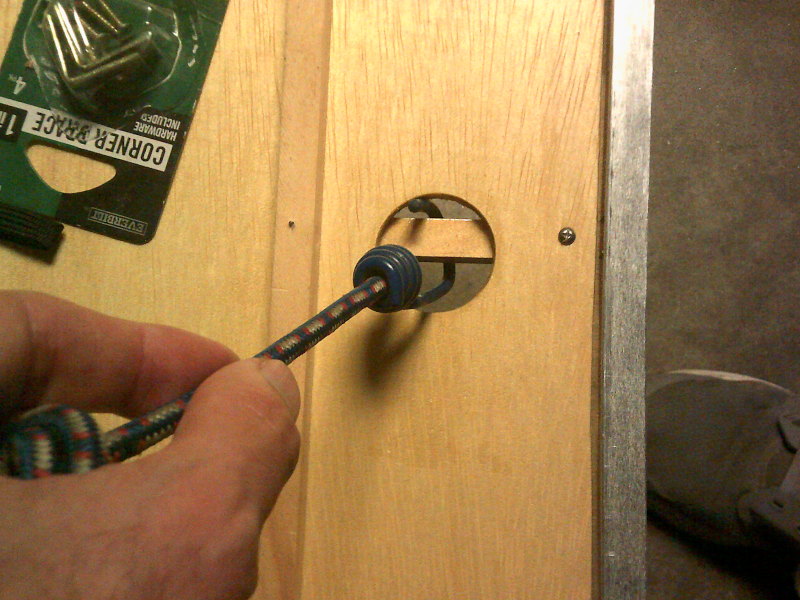
There are four places in the top door, and four near the corners of the frame, with these 1.5" holes with square dowels behind them, to
hook bungee cords into, for fastening down large loads on top (in addition to the D-rings around the sides and ends):
A friend asked about my method for joining the wood pieces. The first question was about preventing splitting when driving a screw
in. I suppose there's a name for what I've been doing, but I don't know what it is. It has been working pretty well for me
though. For the square dowels, when I put the dowel on the edge of the first sheet of wood, it's accessible to clamp hard with a
C-clamp to prevent splitting; and then drilling is not necessary. Here you can see marks left from the C-clamps:
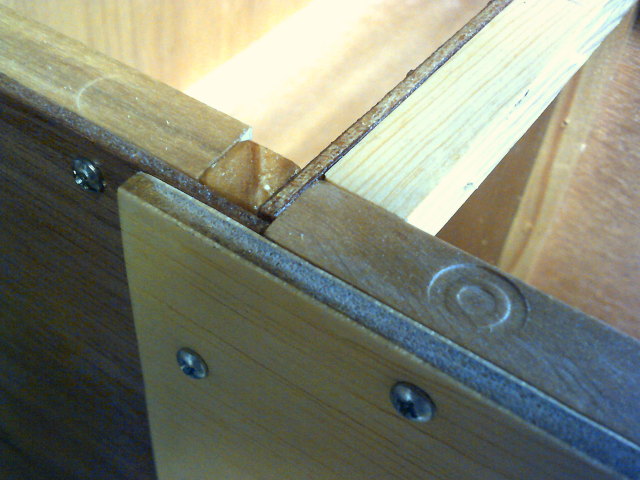
This is at the top, and the top deck of the trailer later got screwed down to these, which means the dowels would not be accessible to clamp
to prevent splitting; so then yes, I drilled first. I often like to put the second screw (at 90°, holding the other plywood
surface) close to the first one, so each one helps hold the wood together to prevent the other one from splitting it as operational stresses
are applied. I like to make the screws long enough to get all the way through the dowel but not so long they stick out the back.
The size (diameter) of the screw is chosen so it's big enough for strength but not so big that there's a risk of splitting wood.
(There's no way to clamp the sheet of plywood screwed into the square dowel.) I also don't want the screw or the pre-drilled hole to
remove too much of the cross-section of the wood and weaken it.
In the picture above, four dowels are visible, one of them being vertical and visible only at its end. All of these come flush. The top deck of the trailer got screwed down to all of these, bracing them really well to each other.
The next question was about keeping the wood layers together so a gap doesn't form when you drive a screw in. I clamp the plywood to the dowel with clamps that will not mar the plywood. This holds things together so they cannot separate as I drive the screw in (which I do with a screwdriver tip on the drill). If a hole is drilled first, there's less tendency to push the pieces of wood apart. When I can't get a clamp on it, I just push with my hand, which is what I did when I screwed the top down.
In cases where a screw has to go into the plywood a long distance from the edge, it can be too much of a challenge to make it hit the center of the dowel behind it. In that case, I drill a small hole from the dowel side, to come out through the plywood (easing up when I'm nearly through, to prevent breakouts), so putting the screw in from the plywood side, it will find the middle of the dowel.
Here're some more pictures:
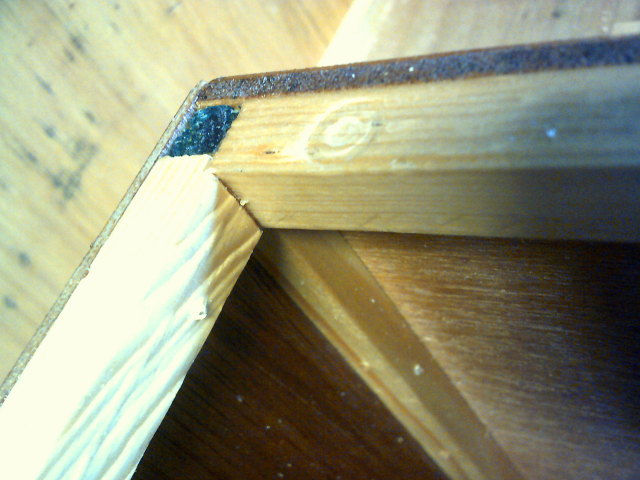
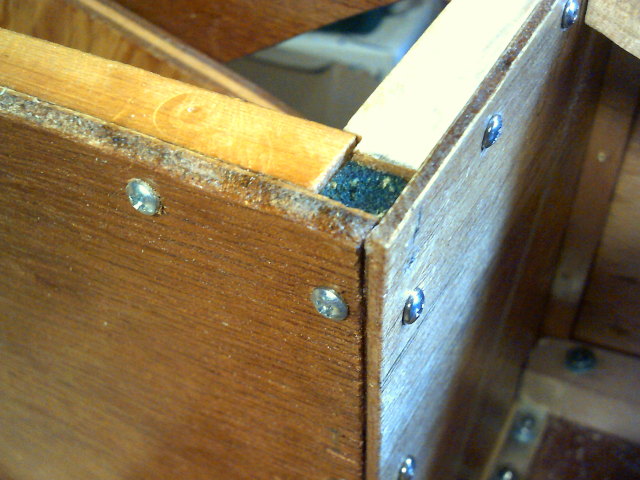
You can see where the tips of the screws come to the surface of the smaller dowel there. I didn't always hit the middle perfectly,
but they'll do just fine for the most part.
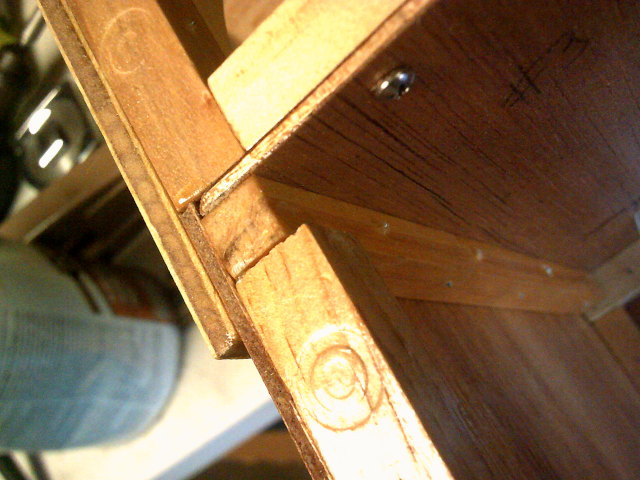
Somehow I failed to get the smaller dowel flush on this one:
In a few places, I've done this:
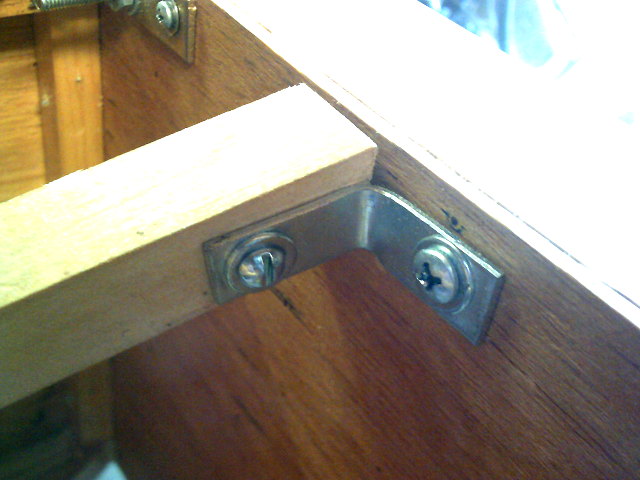
For this one, I had to bend the L-bracket sideways a little bit in the vise since I needed an angle. These two screws are machine
screws, and they push through the holes in the wood and clamp it tightly with a nut. I use flat washers there on the wood, with no
lockwashers, and use blue LocTite thread locker so they cannot loosen on their own. The square dowel there is 1", and the screw on
the right goes into a 1x2 on the other side of the plywood, the 1x2's thinner edge being against the plywood. This is in the tongue
area.
The final big steps were to cut out the top deck of 1/4" plywood, then make the door in it that goes between the wheel wells and runs most of the length of the trailer, and make the whole top relatively flat. The door needs to be strong to support a heavy load on top. I used lift-off hinges again, so the door can be quickly removed when I don't want it on there. To keep it from bouncing open on bumps when there's no load strapped down on top, I just used a bungee cord that would otherwise be used to tie down a load on top. The frame of the top deck comes around the tongue area as all one piece, to add stiffness, and is screwed down to the square dowels that outline the tops of the vertical walls. The door has "joists" made of square dowels, running across underneath, and down the length on top, at right angles to the ones underneath, with long screws sandwiching the plywood door panel in between. These are somewhat visible in the first pictures above, and in the close-up of my hand pulling the bungee cord through a hole with a dowel behind.
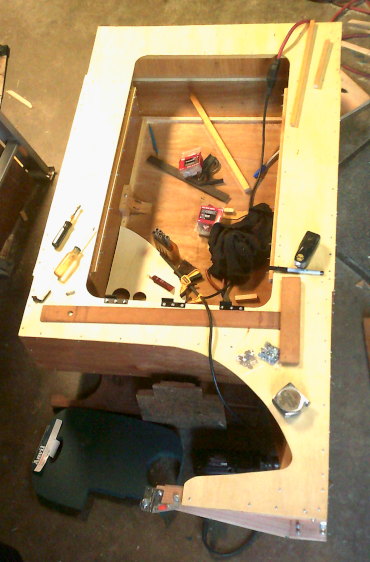
8/3/26: Shown here is the trailer sitting on the garage floor, with tools and screws in it, top door cut but set aside and not in
the picture:
Trivia: Altogether, it has around 750 screws in it.
As I made this trailer and kept looking online for ideas, particularly about the suspension and tongue, I kept coming across videos
about bike trailers a homeless person can sleep in (the name Paul Elkins kept coming up as someone creative who has made several versions),
and I started getting interested in how I could get involved in helping make something like this or other mobile or portable shelters for
the homeless. One video led to the next, and I kind of binge-watched, after having finished the trailer above. I found that
nearly everything I thought I knew about homelessness turned out to be wrong. I've contacted city hall and various non-profits that
help the homeless, but have not made any progress so far. I'm beginning to think nearly everyone else is starting out as lost and
disoriented as I, in regard to making such microhouses. Not only are government efforts not helping, but I found that there's
even a homeless industrial complex, very corrupt, that takes tax money but doesn't want to fix the problem because then the flow of tax
money would end. Anyway, I might be adding another page about making such shelters.
Pardon the poor quality of my cheap $30 Vivitar S126 pocket camera. I don't use a cell phone, the #1 reason being that cell phones
are the prime surveillance device!
posted Jul 12, 2026, page last updated Sep 26, 2026 contact: Garth Wilson,
wilsonminesBdslextremeBcom (replacing the B's with @ and .) (southern California)
No SEO spam!